Check your tools before using them. They must be in their sharpest edges. When a novice is asked to do a job in woodworking, he may haphazardly begin at once without checking the blade of the tools and equipment.
The beauty of a project in woodworking depends mainly on how it is done. Excellent workmanship also depends to a great extent on sharp tools. Dull tools are more dangerous and will not give the best results. Dull tools which very often slip also need more attention and applied force.
This chapter is separately written to give emphasis on the care and maintenance of tools and equipment. Tools should not only be used but also protected to prolong their lives and yield good results.
A good woodworker must have the ability to sharpen tools properly. Using sharp tools saves more time and effort in the execution of the work.
Sharpening Tools and Equipment
The following tools and equipment are commonly used in sharpening.
Grinder for removing the nicks and straightening edges
Oilstone for whetting with the use of oil
Whetstone for whetting or honing with water
Tri-square for testing the squares of the blade
Smooth block of hardwood for honing and removing burr edges
Grinder for removing the nicks and straightening edges
Oilstone for whetting with the use of oil
Whetstone for whetting or honing with water
Tri-square for testing the squares of the blade
Smooth block of hardwood for honing and removing burr edges
Grinding the Plane Iron and Chisel Blade
Grinding straightens the edge and restores the bevel preparatory to sharpening by whetting on the oilstones.
1. Check the blade if it needs grinding. Grinding is needed if:
a. the cutting edge is nicked
b. the bevel has been worn out by much whetting
c. the bevel has been rounded by careless whetting
d. the bevel is incorrectly ground, too long, thin and weak, and nicks easily
e. the bevel is too short and thick and will not cut or penetrate the wood easily
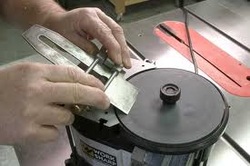
2. Set the grinder in motion. The grindstone should turn towards the plane iron. Use the guide to have a flat even bevel.
3. Move the plane or chisel from side to side to grind all parts of the bevel until it is straight, and at right angle to the side of the blade. Keep the tool blade cool by dipping frequently in water to prevent from heating up and lessening the degree of hardness. Make the corners of the plane iron slightly rounded so it will not produce plane marks on the finished surface.
4. Test the cutting edge as to its right grinding angle which is about 23 to 30 degrees. The length of the bevel is a little longer than twice the thickness of the iron blade.
1. Check the blade if it needs grinding. Grinding is needed if:
a. the cutting edge is nicked
b. the bevel has been worn out by much whetting
c. the bevel has been rounded by careless whetting
d. the bevel is incorrectly ground, too long, thin and weak, and nicks easily
e. the bevel is too short and thick and will not cut or penetrate the wood easily
2. Set the grinder in motion. The grindstone should turn towards the plane iron. Use the guide to have a flat even bevel.
3. Move the plane or chisel from side to side to grind all parts of the bevel until it is straight, and at right angle to the side of the blade. Keep the tool blade cool by dipping frequently in water to prevent from heating up and lessening the degree of hardness. Make the corners of the plane iron slightly rounded so it will not produce plane marks on the finished surface.
4. Test the cutting edge as to its right grinding angle which is about 23 to 30 degrees. The length of the bevel is a little longer than twice the thickness of the iron blade.
Whetting the Plane Iron and Chisel Blade
1. Whet the blade on the oilstone to produce a sharp cutting edge. Hold the blade with the right hand with the support of the left hand. Place the bevel on the stone with the back edge slightly raised. Move the blade back and forth or with a circular motion. Use enough oil to keep the surface of the stone moist. Never use water on an oilstone.
2. Repeat the process until the wire or feather edge has been removed. Be careful to hold it absolutely flat on the stone. Try to wear or use the stone evenly.
3. Finish the whetting by drawing a few strokes on a leather strap or belt to produce a keener edge. Or carefully pull the sharpened edge across a piece of wood to completely remove the burr.
4. O theTest the squareness of the blade by means of a try square.
5. Test the sharpness of the blade on the thumb nail. If it does not slide, it is sharp. Another method of determining the sharpness of the blade is by passing a piece of paper against it. A sharp blade easily cuts the paper.
6. Sharpen drawknife and pocketknife the way you sharpen plane iron and other edge-cutting tools. Only, the drawknife must be held against the grinding wheel in both hands.
Sharpening a Hand Scraper
1. Fasten the hand scraper blade in a vise.
2. Grasp a triangular file with both hands, one at each end. Hold the file at right angle to the blade and move it back and forth over the edge. This method is called drawfiling. A single cut mill file is best for this.
3. Whet the filed edge by moving the scraper blade back and forth on an oilstone.
4. Place flat on one side of the face of the oilstone and move it back and forth, then the other side until the burr is removed.
5. Place the scraper blade in a vise and slightly turn the edge with a burnisher. Turning the edge makes a slight bevel edge on a cabinet scraper. Do the same on the other side. Rub a drop of oil to produce an extra fine edge on a scraper blade.
6. Resharpen a hand scraper by placing it flat on the bench top and by the use of a burnisher, flatten the turned-up edge.
A hand scraper can be resharpened with a burnisher several times without drawfiling. Sharpen the cabinet scraper blade the way the hand scraper blade is.
Sharpening the Gouges
1. Outside the bevel gouges are ground on the outside only. While holding the handle of the gouge with the right hand with the left hand on the blade over the surface of the stone, move the gouge across the face of the stone with a rolling motion.
2. Inside bevel gouges are ground on a conical grinding wheel. It has a special emery wheel attached to the grinder.
3. Whet the inside and outside bevel gouges on a slipstone.
2. Inside bevel gouges are ground on a conical grinding wheel. It has a special emery wheel attached to the grinder.
3. Whet the inside and outside bevel gouges on a slipstone.
Using Oilstone
Oilstone plays an important role in sharpening the blades of the edge-cutting tools. The oilstone we are using in school is artificially made of abrasive particles called “Carborundum” bound together. The average size measures approximately 2.5 cm x 5 cm x 18 cm (1” x 2” x 7”). Oilstones can be bought in different grades – coarse, medium, and fine. A combination oilstone has two sides in two different grades – coarse and fine.
Use enough oil when sharpening edge-cutting tools to allow steel particles to slide easily and not plug the pores of the stone. Do not use water because the steel particles will accumulate on the surface of the oilstone.
For every fine honing, use whetstone. This is a real stone with very fine surface. Called native sharpening stone, it is oftentimes used n sharpening bolos.
Care of Oilstone
1. Keep your oilstone clean and moist.
2. Encase it in a homemade box or wrap it in a clean rug.
3. It is brittle. Avoid dropping it.
2. Encase it in a homemade box or wrap it in a clean rug.
3. It is brittle. Avoid dropping it.
Safety Rules in Using the Grinder
1. Always wear a pair of goggles to protect your eyes.
2. Before starting the grinder, remove all unnecessary things or articles near the motor.
3. Switch on the motor and wait until the wheel reaches the maximum speed.
4. Apply average pressure on the revolving wheel. Do not be in a hurry.
5. Set the tool rest about 1/16 to 1/8” away from the wheel. Too wide setting is dangerous. Adjust the tool rest gradually especially if the nick is big.
6. Use only the face of the wheel and not the side in grinding.
7. When grinding small pieces of work like the spokeshave blade, use a vise-grip plier. Do not use ordinary pliers in holding small blades because if the grip loosens, the blade might slip and cause accident.
8. Watch for your hands and fingers. Keep them at a distance and clear from the revolving wheel. Remove your bracelet and other dangling pieces of jewelry.
9. Watch for overheating or burning of the cutting edge. Burning means turning the edge or part of the blade into bluish black.
10. Switch off the motor and wait until the wheel slows down and stops.
11. Pull out cord or uncord grinder before leaving.
Maintaining a Saw
Every woodworking job involves sawing. There is a variety of saws; each one is intended for a particular job. But two or three different saws can handle almost every job.
To prolong the life of a saw, avoid leaving it lying on a bench or floor where the teeth are exposed and can be damaged. Hang it. Before using the saw, rub the blade with a candle to lubricate it. Rub the blades with a small rug wet with oil before putting them away to avoid rusting. Remember however to wipe off the oil before you start cutting or sawing as the oil will stain the wood. If the saw blade rusts, clean it with a steel wool and apply little oil. Have a blunt saw sharpened by an expert.
The tools needed in sharpening the saws are saw clamp, saw set, and the triangular or slip taper file.
Sharpening Saws
There are three operations in sharpening saws. They are jointing and shaping the teeth, setting the saw, and filing the saw teeth.
Jointing. Inspect carefully the teeth of the crosscut or rip saw to see if they have been previously set or filed uniformly. Inspect the blade (teeth) from the heel to the toe.
If the teeth are uneven in length or worn out due to the excessive use or simply damaged, jointing is necessary. The following are the steps in jointing.
1. Hold the saw between two pieces of wood in a saw or saw clamp.
2. Run a flat or rectangular file over the teeth until every tooth is touched by the file. It is noticeable afterwards that some teeth are quite flat while others were barely touched.
3. When the teeth are of uniform height, they are filled until they have the same size and shape. With the use of a slim taper triangular file, about 15 cm or 18 cm (6” or 7”), start filing on the first gullet on the right portion near the handle and working towards the tip. When the first half or next gullet to the left until all the teeth have been filed. The file is held level and at right angle to the blade of the saw. Do not attempt to produce bevel on the crosscut saw. This is the shaping stage.
Setting the Saw. When the teeth of a rip saw or crosscut saw are even, adjust the saw properly to set the teeth of the handsaw.
1. Tightly fasten the saw in the saw clamp. Set the teeth, starting from the heel of the saw. Bend the points of every other tooth in the same direction as it was originally bent.
2. Unfasten the saw clamp. Reverse the saw and fasten again. Set the alternate teeth or the half in the opposite direction.
The teeth are set so that the cut or kerf will be wide enough to keep the blade of the saw from binding or sticking in the wood. This is called setting.
Filing the Saw Teeth. The crosscut saw is filed in an angle different from the rip saw.
1. Fasten the saw clamp to the bench top.
2. Fasten the saw in the saw clamp with teeth pointing upward. With the handle of the saw on the right, begin filing from the point or narrow end of the saw or heel.
For a rip saw, the teeth are shaped like a series of small chisels.
1. Hold the file level and at right angle to the saw blade, push it straight across the teeth. Count the strokes.
2. Repeat the same stroke and pressure applied on every tooth being filed until half of the teeth have been finished.
3. Reverse the saw, placing the handle at the left and file the other half as you did in steps 1 and 2.
For a crosscut saw, the teeth are filed like a knife point.
1. Do the same as in steps 1 and 2 of rip saw.
2. Hold the file and level it at an angle of 60 degrees to the blade of the saw. Doing this, a bevel is filed on the front of the tooth, while at the same time a corresponding bevel is produced on the rear side of the adjointing tooth. Continue filing until the first half is finished.
3. Reverse the saw and follow the same process as in step 2.
Testing the Newly Sharpened Saw
1. Hold the saw in the right hand.
2. Using the left thumb as a guide, draw the saw blade backward to make a kerf. The first stroke in sawing is done by pulling backward the saw blade. Then move the thumb away for safety.
3. Saw slowly, using long strokes and with only light pressure on the forward stroke.
4. Release the pressure as you are to end the cutting.
5. Hold the almost saw off piece of lumber to prevent it from breaking off and splintering.
All sawing must be done on the waste wood side of the line. If not, the wood will be sawn undersize.
